-
- MSRP: $42.95 | Patent #: 6,906,694
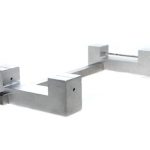
The Pro-Body Jig is an adjustable tool designed to accurately create new axle holes and a lower center of gravity by using a hand drill on BSA and Pine-Car kits derby kits. The required #44 drill bit is included. This tool is not recommended for use with slots.
- The Pro Body jig increases the accuracy of the body block by locking all 4 axle points together in 1 setting.
- The Pro Body Jig is fully adjustable for any wheel from the B.S.A. standard to a fully extended wheel base for maximum performance.
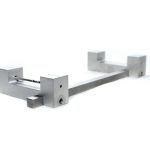
- The Pro Body Jig is designed to help the builder minimize ground clearance and gain lower weight placement (will not work with slots).
- The Pro body Jig has off set drill guide holes for a raised hole option.
Instructions
The Pro-Body Jig is an adjustable tool designed to accurately create new axle holes and a lower center of gravity by using a hand drill on BSA and Pine-Car kits. The required #44 drill bit is included. This tool is not recommended for use with slots.
Test & Measure
1. Test fit the tool on the bottom of the block with the four “ears” positioned on the sides of the block. If the tool will not fit onto the block, use coarse grit sandpaper to reduce the width of the block until the tool fits snuggly. If the tool is loose, the fit can be tightened by placing a piece of paper, folded as needed, between the left or right ears of the jig and the block.
2. Measure and mark the desired position of the new axle holes on one side of the block. Extend the mark from the bottom of the block to the top of the block using a square (or measure and mark near the bottom of the block and near the top of the block, and then join the line with a pencil and ruler). Holes for extended wheelbases are typically positioned 5/8” from the end of the block.
3. Adjust the Pro Body Jig to the desired wheel base; a 3/32 inch hex key is used for making adjustments. The wheel base adjustment can be verified by measuring between the index marks on the jig.
Position the Tool
4. Position the tool on the bottom of the block with the four ears on the sides of the block. Align the index marks on the jig with the lines corresponding to the axle hole positions on the block. Clamp the jig in place with two clamps, one on each of the drilling guides.
5. Hold the block firmly, position the drill bit in the hole, and slowly drill ¾ into the block.
6. Without releasing the clamps, drill the remaining holes.
7. If a raised hole is desired, drill only one of the front holes (either one) and proceed to step 8.
Drill a Raised Hole
8. Transfer the line on the side of the block to the bottom of the block.
9. Position the tool on the desired side of the block, and align the index mark on one of the drilling guides with the line on the bottom of the block. Make sure that the third hole on the guide is positioned near the bottom of the block.
10. Clamp the tool in place and drill the raised hole.
Technical Data
The Pro-Body Jig is an adjustable tool designed to accurately create new axle holes and a lower center of gravity by using a hand drill on BSA and Pine-Car kits derby kits. The required #44 drill bit is included. This tool is not recommended for use with slots.
- The Pro Body Jig easily places the axle holes perpendicular to the centerline of the car and ensures parallelism in the axles front to rear. This helps insure correct tracking of the car and aids in alignment.
- The Pro Body Jig locates all of the axle holes at the same height on the body which helps ensure the car is sitting square to the track, for a equally balanced car left to right and an aid in alignment.
- The Pro Body Jig helps guide the thin #44 drill bit required to drill axle holes preventing deflection for a more accurate job. This is something that can not be done with a drill press plus due to the clearance required in the quill assembly in most hobbyist and home use drill presses to make the press work, there will most likely be some run-out in the drill chuck, this makes the Pro Body Jig the most accurate choice plus only a hand drill or pin vice is required for the job.
- The Pro Body Jig reduces friction!!! By correctly placing the axles in the body a builder will not have to bend or tweak the axles to get the car to run straight (this is the perfect foundation for the best possible Rail Rider™). By getting the axle placements in the correct position the builder will have to make minimal adjustments to get the desired alignment and prevent Cross-Binding the car. This is where it takes excessive corrections in opposite directions to get a car to run straight or be a Rail Rider™, while the car is going in the correct direction excessive load points have been created at friction points, the Pro Body Jig will prevent this.
Product Videos
Additional Information
- MSRP: $47.95
- Patent #: 6,906,694
- UPC: 730176740072
- Part #: DWXPBJ01
- BSA Part #: 613549